

A few years ago, algorithmic trading was a luxury that only proprietary firms, hedge funds, and banks could afford. Luckily for the retail investor, there have been giant improvements when it comes to the democratization of trading technologies. Nowadays, investors with decent coding skills can up their game and benefit from the advantages of algorithmic trading.
In this article, we will go through the basics of creating a fully working trading algorithm for cryptocurrencies and even connect it to a broker (Alpaca) in order to trade. Of course, Python is the natural choice for such a task! Also, this video follows along with the article. Let’s get started!
Table of Contents
Setting up an Alpaca account
Before diving into the code, we will have to create a free brokerage account in Alpaca Markets. This commission-free brokerage firm specializes in offering an excellent API for us to the interface, fetch live market data, and even place our orders.
There is nothing special to the registration form, so I’ll give you some credit and assume that you managed to create your account.
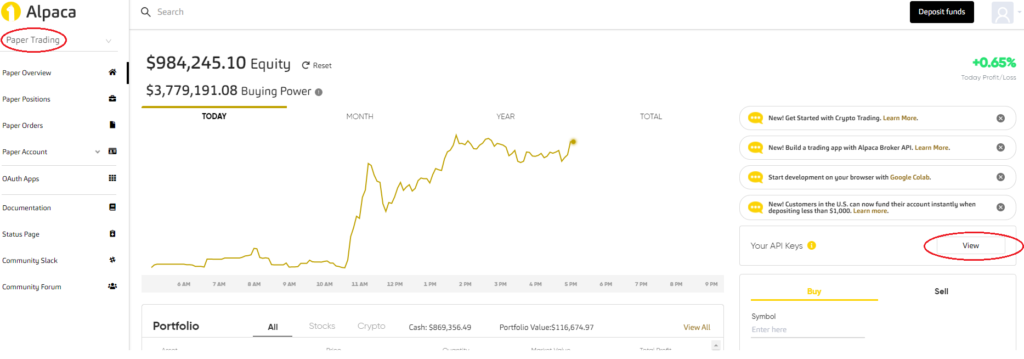
Once you’ve logged into your newly created account, you’ll be able to choose the “Live” (real money) account or the “Paper” account. In order to reduce the cost of your journey towards mastering algorithmic trading, I urge you to start by using your “Paper” Account. You can switch to this account on the top-right drop-down under Alpaca’s logo.
Once in there, click on the “View” button under the API Keys section, and go ahead and copy both strings.
That’s it, now let’s go to the fun part: coding our first algotrading script!
Getting started with Alpaca’s API with Python
Setting up our script
If you don’t already have alpaca’s library installed go ahead and do it:
pip install alpaca-trade-apiStart a new Jupyter notebook or a blank file and import the required libraries:
from alpaca_trade_api.rest import REST, TimeFrame
import pandas as pd
Let’s also set a few parameters that we will use throughout the tutorial. Replace the keys with your own ones!
BASE_URL = "https://paper-api.alpaca.markets"
KEY_ID = <YOUR_ALPACA_KEY>
SECRET_KEY = <YOUR_ALPACA_SECRET_KEY>
Getting historical data from Alpaca’s API
Now, we are ready to connect to the API and request our first DataFrame of historical data for, say, Bitcoin.
# Instantiate REST API Connection
api = REST(key_id=KEY_ID,secret_key=SECRET_KEY,base_url="https://paper-api.alpaca.markets")

# Fetch 1Minute historical bars of Bitcoin
bars = api.get_crypto_bars("BTCUSD", TimeFrame.Minute).df
print(bars)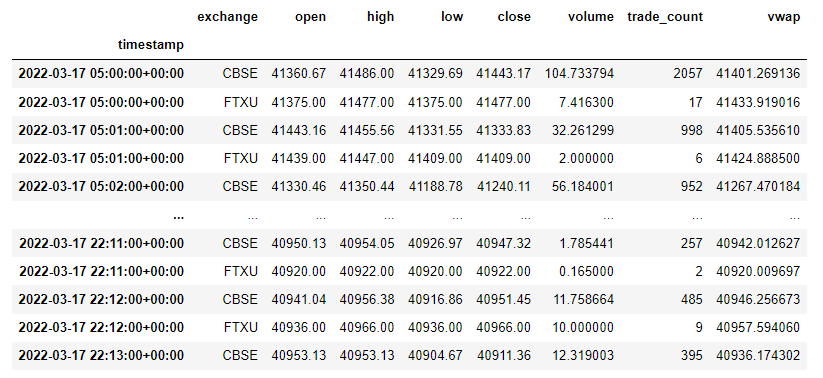
You might have seen that we are receiving prices from multiple exchanges. Currently, Alpaca routes its client’s orders to FTXU, but we will stick to CBSE (Coinbase) for doing our calculations. This is due to the fact that FTXU is somewhat illiquid and thus has missing data for 1Minute bars, whereas Coinbase is one of the most active cryptocurrency exchanges.
# Filter data by exchange
bars = bars[bars.exchange == 'CBSE']
print(bars)
Submitting orders on Alpaca’s API
Submitting orders to Alpaca is as simple as it gets. Throughout this lesson, we will stick to trading with market orders, but keep in mind that it would be a good idea to also play around with limit orders. This is especially true in cases where we are trading in illiquid markets.
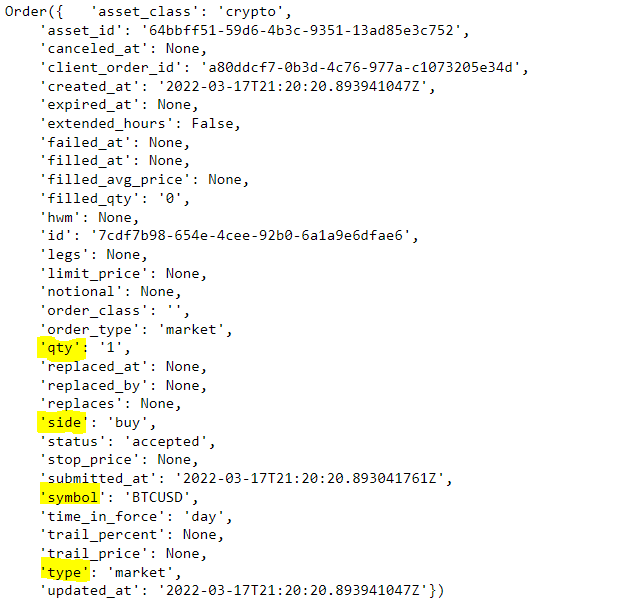
# Create a market order to buy 1 Bitcoin
order_buy = api.submit_order('BTCUSD', qty=1, side='buy')
This will not only submit an order on the exchange but also return an object of Order type:
# Create a market order to sell 1 Bitcoin
order_sell = api.submit_order('BTCUSD', qty=1, side='sell')
It is also easy to find out what your current position is on a given asset.
# Get current position on Bitcoin. Yields error if we don't hold any
api.get_position('BTC')

# Get all positions and find out if we hold any Bitcoin
positions = api.list_positions()
position_qty = 0
for p in positions:
    if p.symbol == 'BTCUSD':
        position_qty = float(p.qty)
print(position_qty)
Having seen the most important features that we will need, it is time to move on to something more useful and create an algorithm that buys and sells in the purest random way possible: by flipping a coin!
Don’t worry, this is just to set up our logic. Later, we will go ahead and create a strategy consisting of two moving averages crossing each other. You’ll quickly find out that it does not perform much better than the coin-flipping strategy… but it definitely feels better to lose money by means of a more complex set of rules!
Creating a simple trading algorithm
A completely random trading algorithm
This first algorithm is very basic and consists of flipping a coin to check if we should buy or sell Bitcoin. Additionally, we only buy if we don’t already have a position. Conversely, we sell only when we currently have Bitcoin in our portfolio.
Let’s first take the previous script that checked our current position and turn it into a function we can reuse:
def get_position(symbol):
    positions = api.list_positions()
    for p in positions:
        if p.symbol == symbol:
            return float(p.qty)
    return 0
Now, let’s go to the algorithm itself. In order to debug and make keep track of what is going on, I took the liberty to aggressively print out almost everything.
import random

SYMBOL = 'BTCUSD'
while True:
    # GET OUR CURRENT POSITION
    position = get_position(symbol=SYMBOL)

    # SCIENTIFICALLY CHECK IF WE SHOULD BUY OR SELL
    gods_say_buy = random.choice([True, False])
    print(f"Holding: {position} / Gods: {gods_say_buy}")

    #CHECK IF WE SHOULD BUY
    if position == 0 and gods_say_buy == True:
        # WE BUY ONE BITCOIN
        print('The gods have spoken:')
        print(f'Symbol: {SYMBOL} / Side: BUY / Quantity: 1')
        api.submit_order(SYMBOL, qty=1, side='buy')
    #HECK IF WE SHOULD SELL
    elif position > 0 and gods_say_buy == False:
        # WE SELL ONE BITCOIN
        print('The gods have spoken:')
        print(f'Symbol: {SYMBOL} / Side: SELL / Quantity: 1')
        api.submit_order(SYMBOL, qty=1, side='sell')
    print('Lets wait for the gods to manifest again...')
    print("*"*20)
    time.sleep(10)
In order to improve our odds, I resorted to some kind of higher being, which I simply referred to as “the gods”. The code is pretty much self-explanatory, but in a nutshell, we have an infinity loop that checks every ten seconds if the gods want us to buy Bitcoin or not. Depending on whether we hold a position or not, we obey their wishes.
A Rule Based (Moving Average Crossover) Trading Algorithm
This algorithm will follow a very popular trading strategy that consists of two moving averages. The first one, which we’ll call “Fast” will consist of calculating the average of the closing price during the previous 12 minutes. On the other hand, we have the “Slow” moving average, which acts the same but contemplates the closing price of the previous 24 minutes.
They are called “fast” and “slow” for a very simple reason: each new price has a greater impact on the “Fast” moving average because we use fewer periods in our calculation. The entire script looks as follows (it assumes that we already started the API and imported the previous libraries).
from datetime import datetime, timedelta
import math
import time

SYMBOL = 'BTCUSD'
SMA_FAST = 12
SMA_SLOW = 24
QTY_PER_TRADE = 1


# Description is given in the article
def get_pause():
    now = datetime.now()
    next_min = now.replace(second=0, microsecond=0) + timedelta(minutes=1)
    pause = math.ceil((next_min - now).seconds)
    print(f"Sleep for {pause}")
    return pause

# Same as the function in the random version
def get_position(symbol):
    positions = api.list_positions()
    for p in positions:
        if p.symbol == symbol:
            return float(p.qty)
    return 0


# Returns a series with the moving average
def get_sma(series, periods):
    return series.rolling(periods).mean()

# Checks wether we should buy (fast ma > slow ma)
def get_signal(fast, slow):
    print(f"Fast {fast[-1]}  /  Slow: {slow[-1]}")
    return fast[-1] > slow[-1]

# Get up-to-date 1 minute data from Alpaca and add the moving averages
def get_bars(symbol):
    bars = api.get_crypto_bars(symbol, TimeFrame.Minute).df
    bars = bars[bars.exchange == 'CBSE']
    bars[f'sma_fast'] = get_sma(bars.close, SMA_FAST)
    bars[f'sma_slow'] = get_sma(bars.close, SMA_SLOW)
    return bars

while True:
    # GET DATA
    bars = get_bars(symbol=SYMBOL)
    # CHECK POSITIONS
    position = get_position(symbol=SYMBOL)
    should_buy = get_signal(bars.sma_fast,bars.sma_slow)
    print(f"Position: {position} / Should Buy: {should_buy}")
    if position == 0 and should_buy == True:
        # WE BUY ONE BITCOIN
        api.submit_order(SYMBOL, qty=QTY_PER_TRADE, side='buy')
        print(f'Symbol: {SYMBOL} / Side: BUY / Quantity: {QTY_PER_TRADE}')
    elif position > 0 and should_buy == False:
        # WE SELL ONE BITCOIN
        api.submit_order(SYMBOL, qty=QTY_PER_TRADE, side='sell')
        print(f'Symbol: {SYMBOL} / Side: SELL / Quantity: {QTY_PER_TRADE}')

    time.sleep(get_pause())
    print("*"*20)
You might ve wondering what the get_pause function is all about. Basically, since we are trading with 1Minute data, we want to run the loop every 60 seconds. Not only that, but we would also like to start each iteration at the start of each minute in order to get the most recent 1Minute bar as soon as it is available to us.
The get_position function is the exact same as in the random algorithm, whereas get_signal checks whether the most recent “Fast” moving average is greater than the “Slow” one.
Get bars fetches 1-minute bars for our target asset, keeps only the rows that correspond to Coinbase (exchange equal to ‘CBSE’) and adds both moving averages before returning the DataFrame.
It’s interesting to compare the performance of both algorithms. You’ll quickly find out that such a simple crossover strategy, the same one that countless daytraders use is almost guaranteed to have similar results to the random coin-flipping algorithm.
Conclusion
Due to the fact that we covered all the basics to get started with algorithmic trading, this article ended up being longer than what I initially estimated it to be. Regardless of this, it has only equipped you with the tools to start creating your own rules, and such a simple strategy should never be used to trade with real money.
Having said that, there’s a huge amount of topics covered here: we created an alpaca account and generated our API keys, installed all the required libraries, played with the basic functionalities of Alpaca’s endpoints, created a basic random strategy, and finally created a rule-based (albeit also simple) strategy.
Don’t hesitate to leave a comment if you have any further questions, feedback, or even if you find a bug in the code.
No responses yet